

Origami
This month’s Playdate is Origami. You know those moments when you get so bored that even the all-knowing internet fails to amuse you anymore? Then maybe it’s time you get off your desk, unplug your computer, and go back to basics – and by that we mean go back to traditional sources of entertainment – like origami, for example. What is Origami? If you’re not familiar with origami, origami is the popular Japanese art of paper folding. It is still disputed whether the art of paper folding is actually Japanese in origin since there have been earlier references to paper folding in China, known to Chinese speakers as “Zhe Zhi,” not to mention that modern paper itself was invented in China and was just later introduced by Buddhists monks during their travels in Japan, but it is a widely recognized that the art of paper folding started to gain international attention after a book on how to fold origami models was compiled by Akira Yoshizawa in 1954. How do you do origami? The appeal of origami mainly lies on its simplicity and the large number of designs that you can make with just a piece of paper. Yup, that’s right – just a piece of paper — and an optional pair of scissors if you want. What kind of design you’re going to used would depend on your experience and the amount of time and effort you’re willing to put in, but since we have a t-shirt business on the site, we thought it would be fun if we’ll try some clothing-related designs. Origami Designs We found a great site that offers plenty of tutorials on clothing-related designs, but since we’re no experts at this, we started with the simpler ones first like this t-shirt design first. The t-shirt design was fun to make, but an outfit would not be complete if there won’t be no skirt to match the top, and so we made this skirt: We already have a top and a skirt, so we decided to move on to a one-piece outfit, and since we’re doing origami, we thought we shouldn’t pass up the opportunity to make something Japanese such as a yukata. We’ve already done three kinds of clothes at this point, two more than what we originally planned to, but we had more fun than we expected that the team requested to make one last design before we wrap things up. This time, we chose a rabbit design with clothes. Pretty cute, huh? We wanted to try a couple more designs after this one but we ran out of time, so we had to save them for next time. Anyways, if you have more time than us, why don’t you check out their list of other designs and try them for yourself? Happy folding! (^_^) Source: Origami. (2012, September 05). In Wikipedia, The Free Encyclopedia. Retrieved 05:43, September 05 2012, from...
read moreUsing Color Schemes
Have you ever looked at a colorful painting and wished that you can extract all those vibrant hues and use them on your own project? If only things were that easy, huh? Well, actually they are. That’s what we learned during our Playdate this month when we experimented with Kuler and color schemes. Kuler is an application that helps you generate and create color schemes for just about any project like business cards and invitations, web pages, and even the motif of your brand new house or wedding reception. We’re afraid brand new houses and wedding receptions are still a bit far-fetched for us, so we had to settle for something more low-key like the miniature dream houses that we previously drew. Playing with color schemes was fun but not particularly challenging, though, so we thought of raising things up a notch by seeing who can make the most colorful and most beautiful house within three minutes. Since not all of us were familiar with the application, some of us tried it for a bit before starting the game. The cool thing about it is even if you know next to nothing about color schemes, you can still generate magnificent colors simply by uploading a picture you like or browsing through the thousands of photos on Flickr and picking the one whose colors you like best. It will then show you the dominant colors that were present in the picture then you can experiment with them by adjusting the general mood that the colors evoke such as bright, colorful, muted, deep, and dark. With everything all set, we started taking turns coloring the houses that got randomly assigned to us, laughing all throughout the game, because although we picked photos whose colors we thought were really good, using them at random proved to be not a very good idea because we ended up with psychedelic houses, ominous clouds, blue lawns, and other things that would probably look a little too out of place in the real world. Still, we guess that’s the fun part – getting the opportunity to stray from the usual path and having fun with it. And had fun, we did. You’ll probably have too.. Good luck! Related Links Kuler http://kuler.adobe.com/...
read moreHow to Make a Collage
Another year has come and passed, and to celebrate the year that was, we decided to do a collage of the things that inspired us, intrigued us, or brought a smile unto our faces in the year 2011. A collage is a compilation of random things, usually pictures, scraps of papers, ribbons, yarns, buttons, or other materials with flat or semi-flat surfaces, combined together to create a whole new piece of work. It’s very simple to do and can be quite a lot of fun too. To begin the activity, we’re going to need the following materials: Old magazines, newspapers, brochures, stationery or pictures for clipping cork board buttons stickers glue scissors paintbrush cup any other random materials that you may want to use Once we have our materials ready, we’re going to get things started by deciding on a theme. This part is actually optional, as you can just go for whatever you feel like combining together. But if you want something meaningful and memorable, you may want to pick a theme that helps you express yourself. It might be about your journey in life, the people you met, the lessons you learned, the achievements you made, your favorite things, or just about anything that’s close to your heart. Then we can start cutting the clippings that we’re going to use for the collage. They don’t have to be of a specific shape. Aside from using different cuts for the clippings, you can also rip them apart, tear them into shreds, or burn their edges to give them a more interesting look. Next, we’ll need the cork board. As the base, we can either leave it as it is, or we can also cover it with a thin layer of colored paper to serve as a background for the collage – which is what we did in this activity. When our cork board is ready to use, we’ll start pasting the clippings we’ve previously gathered together. For our inspiration board, we decided to group the colors with similar hues together to create a smooth transition. Of course, you can go wild and wacky and put clippings with random colors wherever you please. If you want to add a 3D look, also throw in some folded pieces of paper as well as some small and thin materials like yarn, buttons, ribbons, laces, leaves, or flowers. Additionally, you can add some strips of paper with text written on them such as an important day in your life, a quote from your favorite movie or book, or you and your loved ones’ names. You can also paint the collage with glue to give it a glossy look. Here’s our new inspiration board: Number of hours to complete: 4 hours Number of people in our team: 7 So that’s about it! We hope you had as much fun doing it as we did. Until next time!...
read more3D Ship Model: One Piece’s Thousand Sunny
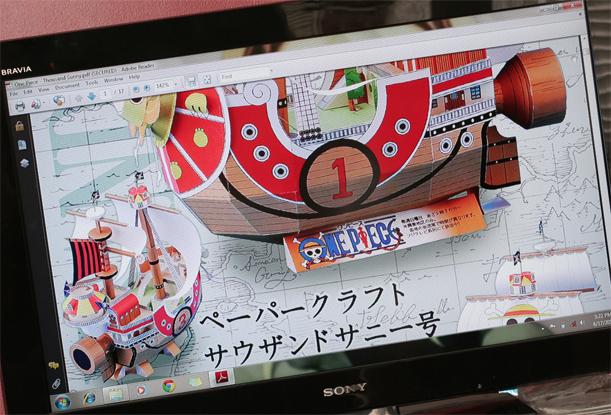
It’s been a while since our last experiment with crafts and stuff, so we decided we’ll share a creative activity with you that we have stumbled upon while browsing the internet. Thousand Sunny is a pirate ship from one of our favorite Japanese animated series – One Piece. For this entry, we’ll tell you how we were able to make one for ourselves using the tutorial released by Toei Animation which we downloaded from an amazing blog about Papercrafts. But before we get on with the story, these are the materials that we used: Paper Glue Scissors/Cutter Stuffing With those in hand, we started things off by downloading the Thousand Sunny PDF file and printing the document using an A4 sized photo paper which we chose because of its thickness and glossy look. The only downside that we discover is that it can be a bit difficult to glue pieces of photo paper together compared to ordinary ones. Once we had everything printed out, we cut around the edges of the images to get the parts that we need for assembling the ship, using a cutter to clear away unwanted parts from trickier pieces that involved holes and gaps. After that, we moved on to the second part (folding) by using the PDF document as a guide. The text was entirely written in Japanese, though, so we just ended up following the illustrations and guessing what the words meant. We then proceeded to assembling the different parts of the ship by gluing the pieces to their rightful places and merging all the components together, capping things off by adding some stuffing to the hollow parts of the ship to make it a little sturdier. And here it is: Thousand Sunny ready to set sail! \ ^_^...
read moreMaking your own Stuffed Toy

It’s been rather cold and raining a lot lately so for this month’s activity, we’re making our own stuffed toys to cuddle and line along our workstations at the studio. These are the fruits of our .. err… hard work, and here’s how you can make one for yourself. But before that, let’s gather the following materials first: Cloth (size depends on your design) Sewing Machine (a great help but not necessary) Needle Thread (same color as your cloth) Tailor’s chalk (or if one is not available, you could probably use a pencil or any other marker that doesn’t leave a permanent mark) Scissors Fillings (could be cotton, discarded cloth, or whatever you prefer to use, we used fillings of an old pillow) Buttons Yarn Miscellaneous materials (depending on your design) Now that our materials are ready, we’ll proceed to drawing an original design for our stuffed toy. It could be an animal, an adorable alien, a cute caricature of a loved one, or anything you want. When the designs are done, we’ll move on to the next step – creating the outline of the toy. To do this, we’ll get a strip of cloth and draw our design on it using the tailor’s chalk. Then we’ll get a pair of scissors and start cutting around the edges of the design. Don’t forget that our stuffed toys will have front and back parts so we either have to make two identical cuts or we could fold the cloth in half with the upper portion serving as the front part and the lower portion serving as the back part before cutting around the edges. When we’re done with the outline, we’ll get the sewing machine and sew the edges together to seal them off, leaving only a small opening where we could insert the fillings to give the toy a proper form. If you’re not familiar with the use of a sewing machine, you can probably consult a sewer or sewing machine manual, or you can choose not to use one altogether and stick with an ordinary needle instead. This is going to take a lot longer, though, so it depends on which option you are more comfortable with. Next, we’ll stuff the toys with the fillings we prepared until they’re plump enough. If some parts are still sagging, we could use bamboo or Popsicle sticks to give them additional support. We’ll then close the remaining opening off using a threaded needle. After that, we’ll breathe some life unto them by adding more details like eyes, hair, hands, feet, or whatever our design requires. For the eyes, we can use a pair of buttons, for the hair, strands of yarn put in place with the help of a needle or glue will do. We can also add in some clothes and accessories by using strips of cloth, paper, carton, plastic or whatever material is applicable and cutting it according to the shape we want then attaching it to the...
read morePaint-a-Mural Challenge
Some people look at clean surfaces and wince at the thought of getting them dirty. We, at BNP, look at them and see an opportunity to use our creativity. That’s how one of our casual chit-chats during lunch ended up giving way to a Paint-a-Mural Challenge. It’s a good thing some of us are already well-acquainted with murals, so the idea received no opposition. However, we thought there would be no fun in assigning the task to two or three experienced people so we decided on asking everyone to participate instead. We gave the project a jumpstart by exchanging ideas on what theme we would like to use and settled on the concept of an amusement park. Then we brought out our sketchpad and passed it around for the staff to draw on. When we finally had a rough draft of the images we wanted on the wall, our first volunteer got some chalk and started drawing the outlines of the mural-to-be. We then took our paintbrushes and took turns in tracing the outlines with acrylic paint and adding some fine details on the painting until it was done. After that, we started to color the BNP logo which was sandwiched among the fluffy characters we drew and left the rest of the painting in black and white. The whole process only took three days to complete (shorter than we expected), so by the fourth day the previously bland wall in the pantry was already sporting a different look – and the way some of the staff have been casting knowing glances, it won’t probably take long before the rest of the walls get a make-over of their...
read more