

Christmas Teaser
It’s that time of the year again, and just like last year when we did the 101 Christmas Tree Designs Challenge, we decided to push our limits one step farther by issuing another challenge to ourselves – only this time that challenge took us way outside of our comfort zones. 😀 We’d like to tell you all about it now, but we want to save it for the month of December so you can truly feel the holiday spirit behind it – and might as well give ourselves some time to enjoy what remains of our *cough* dignity *cough* before our little experiment goes public. 😀 Until then! Keep an eye on the site for updates, alright?...
read moreBasic Writing in Japanese
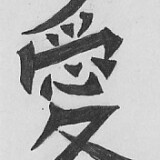
Do you remember the time we taught you some basic words and sentences in Japanese back in January of 2011? This time we’ll teach you how to write them. Well, not exactly the same words and sentences but we’d share an overview of what we studied today for our October Creativity Workshop. For starters, the Japanese have three ways of writing. There is the Kanji, the Hiragana and the Katakana. Of the three kinds of writing mentioned, two of them – Katakana and Hiragana – are syllabaries composed of characters representing a syllable usually formed by combining a consonant and a vowel, while one – Kanji – is composed of symbols that represent a whole variety of things. Let’s take a look at these examples: Image source: www.w3.org The symbols that you can see at the first and second rows are the Kanji characters. Kanji characters are of Chinese origins and are used for words that trace its roots to the Chinese language. Say for example the word love, both Chinese and Japanese Kanji writes it as . The same goes for strength which is written in Chinese and Japanese as . They have different ways of pronouncing them though, so you might want to consider the context of the word or sentence they were used in when reading. The cursive characters that you can see on the third row, on the other hand, are Hiragana characters and they are used for native Japanese words. Say for example, you want to write Konnichiwa which means Hello in Japanese, you can write it like this or if you want to say Ogenki desu ka which means How are you, you can write it like . Lastly, the angular characters that you can see under the Hiragana table are the Katakana characters. They are commonly used for words that have been borrowed from other languages. However, please note that loan words are written the way they are pronounced in Japanese and not the way they are spelled in their original language. Take the word soccer for instance. In Japanese it is pronounced sakka* so it is written as . This is similar with the word basketball which is pronounced as basuketboru** in Japanese and written as . Those are pretty much the basics. Of course the language is much more complex than that, but if you just want something to scribble on your notes, use as a design on your shirt, or use as a nametag to mark your lockers like we did with ours below, learning those can be a good start. You can learn more of the Japanese language and Japanese writing systems by checking out these resources: Hiragana – contains some background information and basic rules on writing Hiragana Katakana – contains some background information and basic rules on writing Katakana Basic Kanji – contains a compilation of basic Kanji characters that you will need to learn to write more complicated Kanji later Kanji-Hiragana-Romaji Converter – features a handy tool that converts Kanji and Hiragana into Romaji (Japanese words written using the English alphabet) Japanese-English Dictionary – features an online Japanese-English/English-Japanese dictionary that provides translation for both languages as well as illustrations on how to write them. Japanese Pronunciation – provides a brief overview of Japanese pronunciation Japanese Loan Words – provides helpful tips in pronouncing Japanese loan words as well as some common examples Notes: *There is no ‘er’ sound in Japanese, so it is replaced with an “a” sound instead. This is true for words like gemu oba (game over), pasokon (short for personal computer),...
read moreQMC Fun Run with Rafael Rosell

Time sure flies fast – our blog is now a year old. Imagine that. I guess we’ve been having so much fun dabbling our hands in all sorts of crafts and activities that we didn’t notice the passage of time. Speaking of fun, we were discussing t-shirt designs for our talk@tee brand when we were invited to join a local Fun Run organized by the Quezon Medical Center for the benefit of its indigent patients. Since we’d love to contribute and run together with celebrity guest Mr. Rafael Rosell, we gamely signed up for the event! And here’s the poster we laid out for them: Clad in jerseys and sweatpants, we gathered at the QMC parking lot on the morning of September 25 together with 1,500 other participants. A firing shot signaled the start at around 6:00 AM, and by 7:30, most of the 3, 5, and 10 km runners were already back in the venue for the announcement of winners, awarding of special prizes, and some photo opportunity with Rafael Rosell. It sure was an exciting Sunday morning and we did have a lot of fun. We were also given an opportunity to introduce Tok, Kat and Tee of talk@tee – but that’s for another fun run post on our talk@tee...
read more3D Ship Model: One Piece’s Thousand Sunny
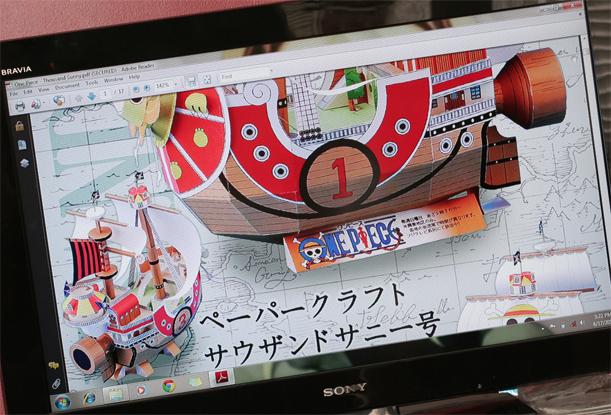
It’s been a while since our last experiment with crafts and stuff, so we decided we’ll share a creative activity with you that we have stumbled upon while browsing the internet. Thousand Sunny is a pirate ship from one of our favorite Japanese animated series – One Piece. For this entry, we’ll tell you how we were able to make one for ourselves using the tutorial released by Toei Animation which we downloaded from an amazing blog about Papercrafts. But before we get on with the story, these are the materials that we used: Paper Glue Scissors/Cutter Stuffing With those in hand, we started things off by downloading the Thousand Sunny PDF file and printing the document using an A4 sized photo paper which we chose because of its thickness and glossy look. The only downside that we discover is that it can be a bit difficult to glue pieces of photo paper together compared to ordinary ones. Once we had everything printed out, we cut around the edges of the images to get the parts that we need for assembling the ship, using a cutter to clear away unwanted parts from trickier pieces that involved holes and gaps. After that, we moved on to the second part (folding) by using the PDF document as a guide. The text was entirely written in Japanese, though, so we just ended up following the illustrations and guessing what the words meant. We then proceeded to assembling the different parts of the ship by gluing the pieces to their rightful places and merging all the components together, capping things off by adding some stuffing to the hollow parts of the ship to make it a little sturdier. And here it is: Thousand Sunny ready to set sail! \ ^_^...
read moreIntroducing Talk@tee: Our T-Shirt Project!
Wohoo! It feels good to be back, and yes, we are so back! The BNP Design Studio blog has been a little quiet due to the project we’ve been cooking these last few months, but now that it’s finally underway, we’re very proud to introduce our new babies to you. Meet Tok, Kat, and Tee – the latest addition to BNP Design Studio’s list of original characters and the heroes of our very own line of shirts. Yup, you heard that right. We are no longer just providing third party merchants the cute and trendy designs that you have loved for years, we have now branched out to manufacturing and distributing them ourselves under our talk@tee brand. In fact, we just had a pre-launch last July 23, 2011 where we officially made the official website of talk@tee, along with our first batch of designs that are now ready for purchase, available to the public. It’s only been a week since then, but so far the response has been rather great!, so we will be working on giving you more designs to choose from as well as adding more improvements in the site itself in the coming days. So come see our shirts and we’ll let them do the rest of the talking. You may also want to like our Talk@tee Fan Page or add Tok, Kat and Tee as a friend on Facebook while you’re at it. ^_^ World of Tokkats Connectees Random Like talk@tee on Facebook! An interesting mix of new and old, these shirts feature Tok, Kat, and Tee catching up with the latest trends and reviving good old Filipino customs and cultural icons. Designed for COUPLES who want to express their affection for one another, FRIENDS who love hanging out together, or GROUPS and organizations bound by a common goal, Connectees tell one continuous story spread out among several shirts. Included in this category are short comic strips featuring Tok, Kat, Tee, and other miscellaneous themes. Got something else in mind? No problem! We have a whole bunch of random designs for you to choose from....
read moreMaking your own Stuffed Toy

It’s been rather cold and raining a lot lately so for this month’s activity, we’re making our own stuffed toys to cuddle and line along our workstations at the studio. These are the fruits of our .. err… hard work, and here’s how you can make one for yourself. But before that, let’s gather the following materials first: Cloth (size depends on your design) Sewing Machine (a great help but not necessary) Needle Thread (same color as your cloth) Tailor’s chalk (or if one is not available, you could probably use a pencil or any other marker that doesn’t leave a permanent mark) Scissors Fillings (could be cotton, discarded cloth, or whatever you prefer to use, we used fillings of an old pillow) Buttons Yarn Miscellaneous materials (depending on your design) Now that our materials are ready, we’ll proceed to drawing an original design for our stuffed toy. It could be an animal, an adorable alien, a cute caricature of a loved one, or anything you want. When the designs are done, we’ll move on to the next step – creating the outline of the toy. To do this, we’ll get a strip of cloth and draw our design on it using the tailor’s chalk. Then we’ll get a pair of scissors and start cutting around the edges of the design. Don’t forget that our stuffed toys will have front and back parts so we either have to make two identical cuts or we could fold the cloth in half with the upper portion serving as the front part and the lower portion serving as the back part before cutting around the edges. When we’re done with the outline, we’ll get the sewing machine and sew the edges together to seal them off, leaving only a small opening where we could insert the fillings to give the toy a proper form. If you’re not familiar with the use of a sewing machine, you can probably consult a sewer or sewing machine manual, or you can choose not to use one altogether and stick with an ordinary needle instead. This is going to take a lot longer, though, so it depends on which option you are more comfortable with. Next, we’ll stuff the toys with the fillings we prepared until they’re plump enough. If some parts are still sagging, we could use bamboo or Popsicle sticks to give them additional support. We’ll then close the remaining opening off using a threaded needle. After that, we’ll breathe some life unto them by adding more details like eyes, hair, hands, feet, or whatever our design requires. For the eyes, we can use a pair of buttons, for the hair, strands of yarn put in place with the help of a needle or glue will do. We can also add in some clothes and accessories by using strips of cloth, paper, carton, plastic or whatever material is applicable and cutting it according to the shape we want then attaching it to the...
read more