

QMC Fun Run with Rafael Rosell

Time sure flies fast – our blog is now a year old. Imagine that. I guess we’ve been having so much fun dabbling our hands in all sorts of crafts and activities that we didn’t notice the passage of time. Speaking of fun, we were discussing t-shirt designs for our talk@tee brand when we were invited to join a local Fun Run organized by the Quezon Medical Center for the benefit of its indigent patients. Since we’d love to contribute and run together with celebrity guest Mr. Rafael Rosell, we gamely signed up for the event! And here’s the poster we laid out for them: Clad in jerseys and sweatpants, we gathered at the QMC parking lot on the morning of September 25 together with 1,500 other participants. A firing shot signaled the start at around 6:00 AM, and by 7:30, most of the 3, 5, and 10 km runners were already back in the venue for the announcement of winners, awarding of special prizes, and some photo opportunity with Rafael Rosell. It sure was an exciting Sunday morning and we did have a lot of fun. We were also given an opportunity to introduce Tok, Kat and Tee of talk@tee – but that’s for another fun run post on our talk@tee...
read more3D Ship Model: One Piece’s Thousand Sunny
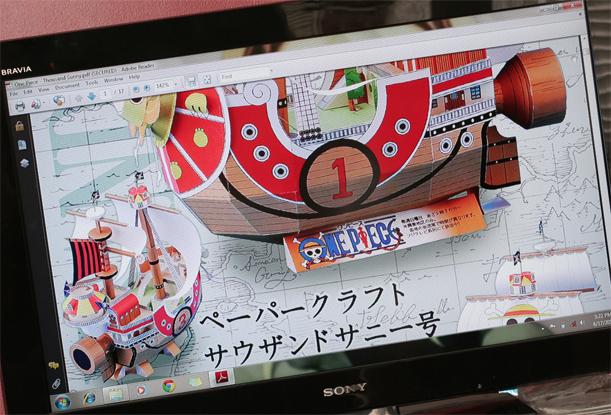
It’s been a while since our last experiment with crafts and stuff, so we decided we’ll share a creative activity with you that we have stumbled upon while browsing the internet. Thousand Sunny is a pirate ship from one of our favorite Japanese animated series – One Piece. For this entry, we’ll tell you how we were able to make one for ourselves using the tutorial released by Toei Animation which we downloaded from an amazing blog about Papercrafts. But before we get on with the story, these are the materials that we used: Paper Glue Scissors/Cutter Stuffing With those in hand, we started things off by downloading the Thousand Sunny PDF file and printing the document using an A4 sized photo paper which we chose because of its thickness and glossy look. The only downside that we discover is that it can be a bit difficult to glue pieces of photo paper together compared to ordinary ones. Once we had everything printed out, we cut around the edges of the images to get the parts that we need for assembling the ship, using a cutter to clear away unwanted parts from trickier pieces that involved holes and gaps. After that, we moved on to the second part (folding) by using the PDF document as a guide. The text was entirely written in Japanese, though, so we just ended up following the illustrations and guessing what the words meant. We then proceeded to assembling the different parts of the ship by gluing the pieces to their rightful places and merging all the components together, capping things off by adding some stuffing to the hollow parts of the ship to make it a little sturdier. And here it is: Thousand Sunny ready to set sail! \ ^_^...
read moreMaking your own Stuffed Toy

It’s been rather cold and raining a lot lately so for this month’s activity, we’re making our own stuffed toys to cuddle and line along our workstations at the studio. These are the fruits of our .. err… hard work, and here’s how you can make one for yourself. But before that, let’s gather the following materials first: Cloth (size depends on your design) Sewing Machine (a great help but not necessary) Needle Thread (same color as your cloth) Tailor’s chalk (or if one is not available, you could probably use a pencil or any other marker that doesn’t leave a permanent mark) Scissors Fillings (could be cotton, discarded cloth, or whatever you prefer to use, we used fillings of an old pillow) Buttons Yarn Miscellaneous materials (depending on your design) Now that our materials are ready, we’ll proceed to drawing an original design for our stuffed toy. It could be an animal, an adorable alien, a cute caricature of a loved one, or anything you want. When the designs are done, we’ll move on to the next step – creating the outline of the toy. To do this, we’ll get a strip of cloth and draw our design on it using the tailor’s chalk. Then we’ll get a pair of scissors and start cutting around the edges of the design. Don’t forget that our stuffed toys will have front and back parts so we either have to make two identical cuts or we could fold the cloth in half with the upper portion serving as the front part and the lower portion serving as the back part before cutting around the edges. When we’re done with the outline, we’ll get the sewing machine and sew the edges together to seal them off, leaving only a small opening where we could insert the fillings to give the toy a proper form. If you’re not familiar with the use of a sewing machine, you can probably consult a sewer or sewing machine manual, or you can choose not to use one altogether and stick with an ordinary needle instead. This is going to take a lot longer, though, so it depends on which option you are more comfortable with. Next, we’ll stuff the toys with the fillings we prepared until they’re plump enough. If some parts are still sagging, we could use bamboo or Popsicle sticks to give them additional support. We’ll then close the remaining opening off using a threaded needle. After that, we’ll breathe some life unto them by adding more details like eyes, hair, hands, feet, or whatever our design requires. For the eyes, we can use a pair of buttons, for the hair, strands of yarn put in place with the help of a needle or glue will do. We can also add in some clothes and accessories by using strips of cloth, paper, carton, plastic or whatever material is applicable and cutting it according to the shape we want then attaching it to the...
read morePaint-a-Mural Challenge
Some people look at clean surfaces and wince at the thought of getting them dirty. We, at BNP, look at them and see an opportunity to use our creativity. That’s how one of our casual chit-chats during lunch ended up giving way to a Paint-a-Mural Challenge. It’s a good thing some of us are already well-acquainted with murals, so the idea received no opposition. However, we thought there would be no fun in assigning the task to two or three experienced people so we decided on asking everyone to participate instead. We gave the project a jumpstart by exchanging ideas on what theme we would like to use and settled on the concept of an amusement park. Then we brought out our sketchpad and passed it around for the staff to draw on. When we finally had a rough draft of the images we wanted on the wall, our first volunteer got some chalk and started drawing the outlines of the mural-to-be. We then took our paintbrushes and took turns in tracing the outlines with acrylic paint and adding some fine details on the painting until it was done. After that, we started to color the BNP logo which was sandwiched among the fluffy characters we drew and left the rest of the painting in black and white. The whole process only took three days to complete (shorter than we expected), so by the fourth day the previously bland wall in the pantry was already sporting a different look – and the way some of the staff have been casting knowing glances, it won’t probably take long before the rest of the walls get a make-over of their...
read moreBreaking the Summer Fever
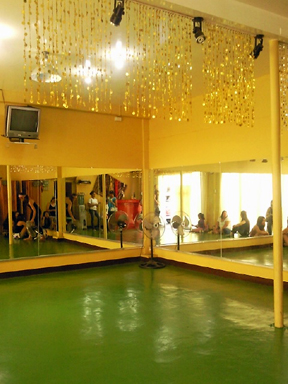
It’s getting hot out there! And here at BNP, we decided to raise the heat level a notch higher by trying some sizzling moves to help us become fitter this scorching season. Our weapon of choice? Dancing. Saturday saw us in an unfamiliar dance studio we rented out where we traded our pencils, and graphic tablets for our rubber shoes and some waist scarves(for a bit of belly dancing). ^_^ But of course, we can’t just head straight to the fun part without going through the basics, so we warmed up the floor by doing some exercises first. After some snapping noises from bones suddenly woken from a deep slumber, we were finally able to start what we went there for. Dancing has never been the strong point of some of us. But still, for this session, we gamely accepted the challenge of coming up with our own modern jazz dance routine. We initially thought that it would take us an entire day to devise some basic moves, but we surprised ourselves when we were able to pull it off in half a day – each contributing ideas with unexpected zeal. Finally, after everyone has demonstrated their suggestions, we ended the day with a complete routine – and some additional hip snap move in belly dancing....
read moreDigital T-Shirt Printing
Shopping for clothes can be a challenge at times. Even if money is not an issue for you, looking for the perfect design can still take considerable time and effort unless you’re lucky enough to find something you fell in love with at first sight. Not all of us are usually that lucky, though, so that’s a bummer, right? Nope! There’s actually no reason to fret because if you don’t like the designs that your favorite retail stores or boutiques offer, you can always print your own. How? Through digital t-shirt printing. Why don’t you try to gather the following materials so we can give it a try? Materials Needed: Heat Press (you can also use a flat iron if you don’t have one) Heat Transfer Paper (one for white fabrics and one for colored ones) T-shirt to print on (could be old or new, it depends on you) Tracing wheel/scissors/cutter (either of the three will do) Pigment or dye ink Printer Computer Teflon Printing Your Design Before we can start printing, we’re going to need a design first. If you have some drawing skills, you can draw your own design on paper then upload it to your computer by using a scanner. If you can draw your design directly on your computer, that would be even better. You can then color it digitally through image editing programs like MS Paint, Adobe Photoshop, or GIMP to name a few. If you’re not very fond of drawing, you can search and buy royalty-free images at stock image libraries like ClipartOf.com or you can purchase one from our stock illustrations. Also, if you’re going to use a white shirt for printing, you would need to invert the design the same way images appear on a mirror. There would be no need to change anything if you’ll be using a black one. Once you’re done with your design, get a heat transfer paper (don’t forget to use the appropriate paper for the right color of fabric), and put it on the paper tray of the printer. Before you print your design, replace your regular ink with pigment ink first. After you’re done changing it, hit the print button and wait for your design to be printed. If you don’t have the necessary equipment for this right in your own home, you can go to a computer rental shop and ask them if they can print it for you (some shops also do image editing for customers for a fee). Just remember to bring a heat transfer paper and pigment ink with you as you cannot use ordinary paper or ink for digital t-shirt printing. After your design has been printed on the heat transfer paper, cut around the edges of the design until no background is left. Next, peel the sticky part of the heat transfer paper from its base and stick it on your shirt. This is only applicable for colored shirts. If you’re using a white shirt, there’s no need to peel it anymore. Just press it against the cloth. Prepare the heat press after that. If you don’t have one or you don’t know someone who does, you can use a flat iron instead. When you have your heat press ready, locate the temperature regulator and set the temperature to 180 degrees and the timer to 30 seconds. Just a note, though, this temperature is what worked for us. However, different fabrics have different resistance to heat, so you might have to experience a bit which temperature would be best for your shirt. If you don’t want to run...
read more